Using the ATMS Map
The ATMS map provides a visual display of events on the roadway, device statuses, traffic conditions and other map layers that you may need access to in day to day operations. Events and devices are displayed using easily recognizable map icons, and you can access information and control screens related to those events or devices from the icons. There are several buttons provided on the upper right portion of the screen that you can use to control or interact with the map.
| ICON | DESCRIPTION | DESCRIPTION |
|---|---|---|
| Map Layers | Display traffic conditions and other read-only map layers. | |
| Search | Find a street, location or landmark on the map. | |
| Map views | Access and use bookmarked Map Views. | |
| Zoom in or out | Change the zoom level of the map. |
In addition to the map controls, there is also an Action Panel, which you can use to turn device layers on and off, and to open menus related to events, devices and traffic data managed in the ATMS. The Action Panel only shows icons for functionality you are authorized to access.
![]()
Navigating the Map
You can navigate around the map in the following ways:
| DESIRED OUTCOME | ACTION |
|---|---|
| Pan/Move the Map | Click and drag the map |
| Zoom In | Scroll in on your mouse scroll wheel OR Double click on the map OR Click on the |
| Zoom Out | Scroll in on your mouse scroll wheel OR Double click on the map OR Click on the |
Map Icons
You can use the map icons to access additional information and control screens for the events, devices and other features they represent. The following actions are possible:
| ACTION | FUNCTION |
|---|---|
| Hover over a Map Icon | View summary information or description of the event, device or location |
| Left Click a Map Icon | Open an information view for the event, device or location |
| Right Click a Map Icon | Open a menu of options available for the event, device or location. |
Action Panel
The action panel, located near the bottom of the map, displays a set of icons representing the area they are used to control. It allows you to show or hide External Event and Device layers, or to access functionality related to each area through right-click menus.
| BUTTON | AREA | DESCRIPTION |
|---|---|---|
| Alerts | Missing person alerts such as Amber, Silver, Green or Blue Alerts | |
| Events | Planned or unplanned events that affect traffic, including weather events | |
| External Events | Events reported by external sources such as WAZE, traffic data providers, CAD systems or neighboring agencies. | |
| Signs | Dynamic Message Signs (fixed and portable) | |
| LCS | Lane control gantries | |
| Cameras | Closed-circuit TV cameras with a view of a roadway | |
| Traffic Data | Traffic data sources and travel time information | |
| HAR | Highway Advisory Radio | |
| Ramp Meters | Ramp meter controllers | |
| Wrong Way Driver | Wrong way driver detection stations | |
| Rest Areas | Truck parking rest areas | |
| RWIS | Weather stations and other sources of weather information |
Search the Map
The Search control can be used to search for events, devices, and locations such as intersections and landmarks.
You can enter event or device ids, roadway names, location descriptions, landmarks or coordinates (latitude/longitude). The ATMS presents possible search results as you type, with icons indicating the type of result (event, device, location).
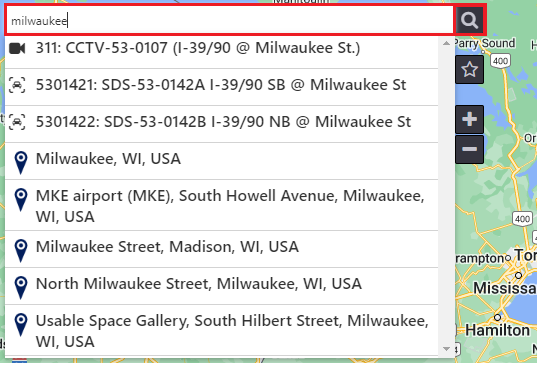
Additionally, you can use search keywords to filter the results to a specific type of item. Enter the keyword first and then the text to search for within items of that type.
| Object Type | Keyword |
|---|---|
| Geographic Location, Address, Landmark or Intersection | Place |
| Cameras | CCTV |
| Signs | SIGN |
| Traffic Detectors | TRAF |
| Beacons | BEACON |
| RWIS | RWIS |
| Events | Event |
You can left-click on a search result to navigate the map to the location, event or device. If no result is suggested, or you are searching for a latitude and longitude coordinate, press enter on the keyboard to complete your search. If the selected result is a geographic location, the system displays a map pin to indicate the actual location of the result.
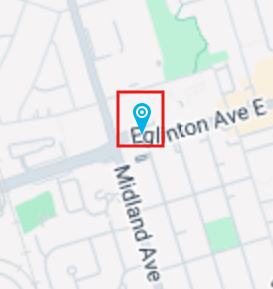
The map pin remains on screen while zooming or panning the map. The pin is removed when you:
- Click on the Traffic Layers or Map Views controls
- Click on a map icon
- Click on an Action Panel item
Turn Map Layers On and Off
There are three types of map layers available in the ATMS:
- Operational layers that are used to display events, devices, facilities or other items that you can interact with or control. They are controlled using the Action Panel.
- Traffic Data layers that can be used to view current traffic conditions. They are controlled using the Map Layers icon.
- Read-Only layers that provide information about locations, facilities, weather conditions or other points of interest on the map. They are controlled using the Map Layers icon.
Turn Operational Layers On and Off
To display or hide operational layers on the map, click on the representative icon on the Action Panel. Layers that are turned on are highlighted on the Action Panel. In the image below, the DMS and HAR layers are turned on.
The Event layer cannot be turned off, but can be filtered to reduce the number of events displayed.
Filter Event Layer
To filter the events displayed on the map, right click on the event icon on the Action Panel and select Set Filter. You can use the Event Map Filter to specify:
- The Types of Events you want to see on the map
- Whether the system should show events you own, even if it is of a type you have chosen to hide
- Which Planned events should be displayed
- Use Default Behaviour
- Show all planned events that are Active or are within their Advance Plan/Pre-warning period, or that are scheduled to be active at the current time
- Custom Filter
- Show future events starting within a selected number of hours or days, or show all future events
- Show active events that end within a selected number of hours or days, or all active events
- Use Default Behaviour
The event icon on the Action Panel indicates when an event filter is in use.
Change the Map Type
The ATMS base map type can be changed. Available options are Default, Satellite and Terrain.
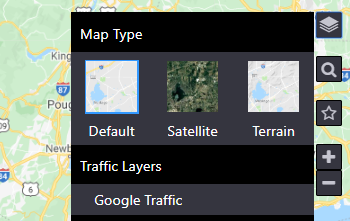
To change map type hover over the desired map type and click.
- Default: Show roadways.
- Satellite: Shows satellite view
- Terrain: Shows terrain view.
Turn Traffic Layers On and Off
Traffic conditions layers can be displayed on the ATMS map. These may be created based on data collected by the ATMS from devices and probe data sources or be taken from a third-party source such as Google. Only one of the available traffic layers can be displayed at a time.
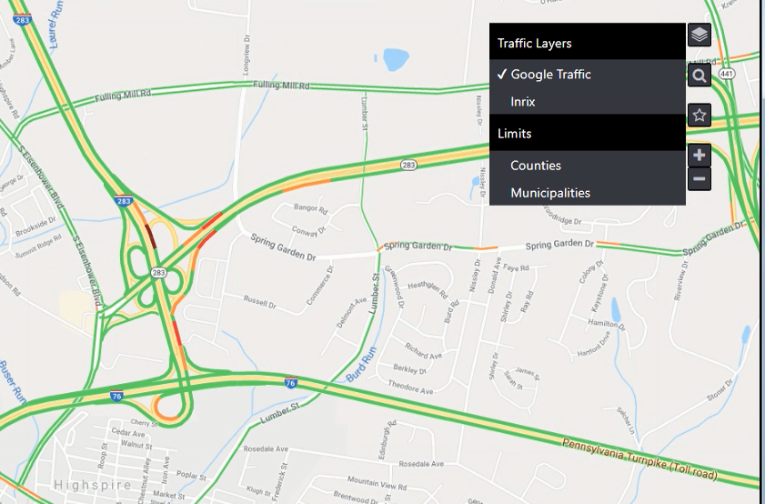
To turn a traffic layer on or off, click on the Map Layers icon, and then click on the name of the layer to display. A checkbox will be shown next to the selected layer.
To change the layer that is displayed, click on the name of the desired layer.
To turn traffic layers off, click on the name of the traffic layer that is currently checked. The checkbox will be removed and the layer turned off.
In general:
- Full speed is green
- Reduced speeds show as yellow
- Slow or stopped speeds show as red
Turn County and Municipality Layers on and Off
County and Municipality layers can be displayed on the ATMS map. Only one of the available Limits layers can be displayed at a time. Hover over a polygon on the map to view the name of the area.
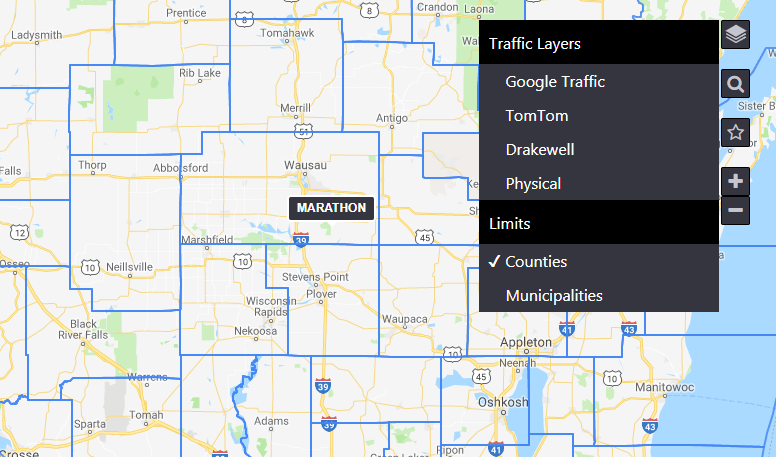
To turn a Limits layer on, click on the Map Layers icon, then click on the name of the layer to display. A checkbox will be shown next to the selected layer.
To change the layer that is displayed, click on the name of the desired layer.
To turn limits layers off, click on the name of the layer that is currently checked. The checkbox will be removed and the layer turned off.
Turn Map Layer On and Off
Various fixed infrastructure read only Map layers can be displayed on the ATMS map. Multiple available Map layers can be displayed simultaneously.
To turn a Map layer on, click on the Map Layers icon, then click on the name of the layer to display. A checkbox will be shown next to the selected layer.
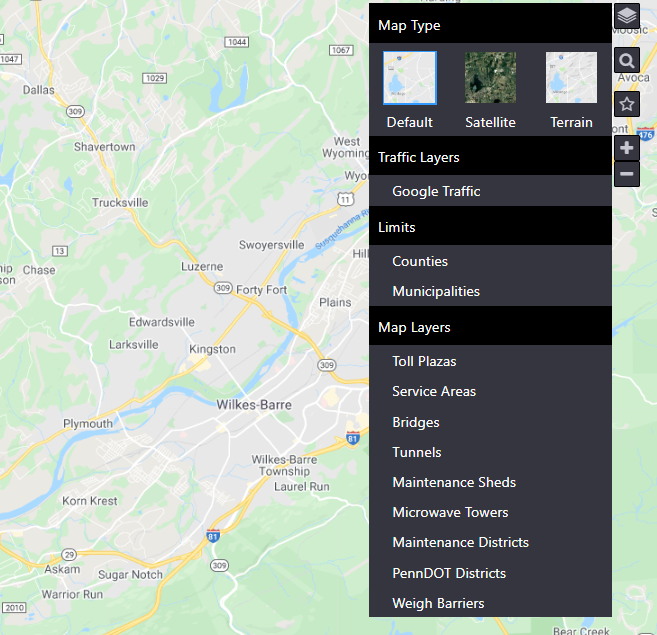
To change the layer that is displayed, click on the name of the desired layer
To turn map layers off, click on the name of the layer that is currently checked. The checkbox will be removed and the layer turned off.
Available fixed infrastructure layers are:
- Toll Plazas
- Service Areas
- Bridges
- Tunnels
- Maintenance Sheds
- Microwave Towers
- Maintenance Districts
- PennDOT Districts
- Weigh Barriers
Map Views
Users can bookmark Map Views, which save the current map center, zoom level, and visible map layers (including filter settings). Map views can be public (available to everyone) or private (available to you only). You can only create a public map view if you are authorized to do so by your system administrator.
Use a Map View
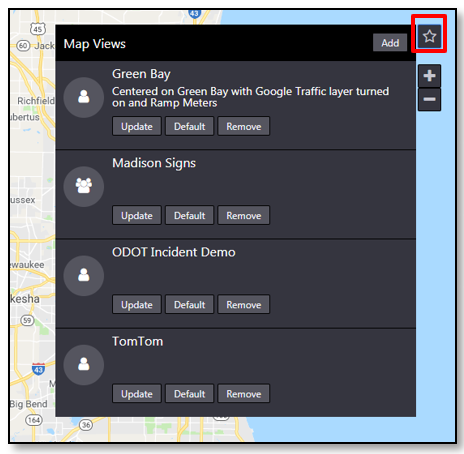
To use a Map View, click on the bookmark icon to open the Map Views list. Click anywhere on the desired Map View (that is not a button) to load the map view. The ATMS will automatically change the map center and zoom, and set the visible map layers and filters to match the Map View.
Your default Map View is displayed at the top of the list. All other Map Views are displayed in alphabetical order.
Default Map View
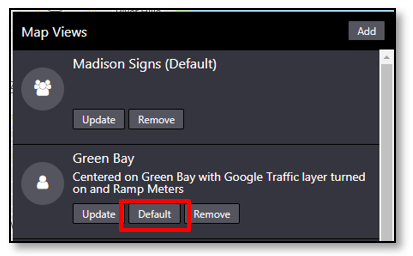
You are able to set a Default Map View, which the ATMS will load automatically when you first access the map. To set your Default Map View, click on the Default button of the desired Map View.
Your current default map view is displayed at the top of list of map views, and will show the text (Default) next to its name.
You can use public or private map views as your default.
Add a Map View
To add a Map View that includes your current map center, zoom and map layers, open the Map Views panel using the bookmark button, and then click Add.
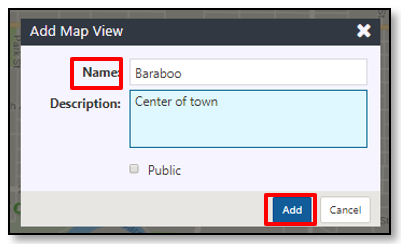
Enter a Name and optional Description for the map view. If you are authorized to create public Map Views, indicate whether or not you want the new Map View to be public. Click Add to finish adding the Map View. It will be available in the list of bookmarked Map Views immediately.
Modify a Map View
You will be able to modify a Map View if:
- You created it OR
- It is a public Map View and you are authorized to manage public views
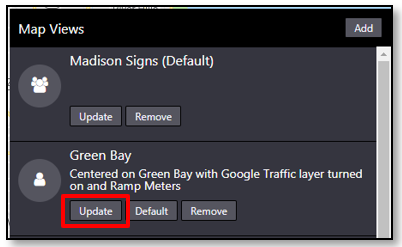
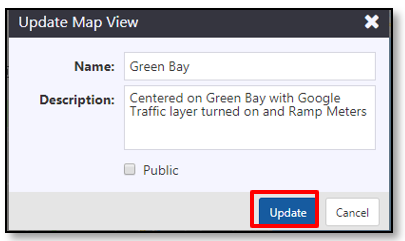
To modify a Map View, open the Map Views panel using the bookmark button, find the desired map view and click Update.
- If you only wish to change the name, description or visibility (public/private) of the map view, click on the Map View to load it first
- If you wish to change the map center, zoom level or layers that are included in a Map View, navigate the map to the desired location and turn on the desired layers before clicking the Update button
Update the name, description and visibility of the map view as needed and click Update. The changes to the Map View will be available to all users who can see the Map View immediately.
Remove a Map View
You will be able to remove a Map View if:
- You created it OR
- It is a public Map View and you are authorized to manage public views
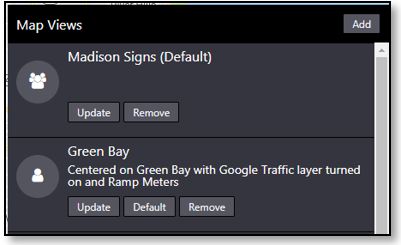
To Remove a Map View, open the Map Views panel using the bookmark button, find the desired map view and click Remove. You will be asked to confirm that you would like to remove the view. Once you've confirmed, the map view will be removed for all users that have access to it.
View Location Details
Right click anywhere on the map to view information about a location.
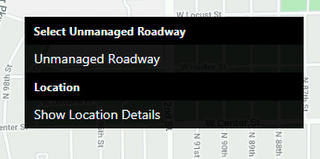
Select Show Location Details to show the Location Details window.
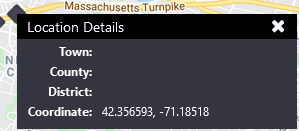
The Location Details window displays:
- Town: The name of the town where the point is located.
- County: The name of the county where the point is located.
- District/Region: The name of the district/region where the point is located.
- Coordinate: The latitudinal and longitudinal coordinates where the point is located.